Showing posts with label 15mm. Show all posts

Friday, May 9, 2014

15mm WW2: Russian Armor

This week I was able to finish off my complete Russian army in 15mm for Operation Bagration. Last week I managed to get the rifle platoon and support weapons completed, and this week was for all the armor I needed. Totally I have ten vehicles for the army. Here they are all together.

The single color scheme made them a breeze to paint. The longest delay I had was assembling the Plastic Soldier Company's T34 models, which took a few sessions to do.  The Battlefront models were easy and fairly idiot-proof, which is so necessary for me.

I painted them all with PSC's spray paints, this color being the aptly named "Russian Armor" color. The PSC models took the paint wonderfully and only needed a thin coating to look good. The Battlefront models look just as fine, but needed a bit more paint to cover.

Starting at the front and working back, here's what you're looking at.

This is a Battlefront IS-2. I only need one for my purposes. There is supposed to be an MG mounted on it, but I couldn't figure out where and expected the flimsy thing would just break off anyway. So I left it off.

Here is the bulk of the armor, T34/76 & 85 from Plastic Soldier Company. These tanks were a bitch to assemble (for me, real modellers don't struggle with them) and I screwed up all of them in one way or another. Oh well. These were a Christmas gift last year from my son, and I'm glad to have finally assembled them.

In the picture above the front two are 85s and the rear three are 76s. I built turrets for both, so I can interchange them as needed. That's a cool feature of these PSC kits.

Here are two SU-76M self-propelled guns from Battlefront. These fit together nicely, thought it took me a minute to understand what the bent bits were. They turned out to be the railing pieces at the back of the vehicle.

Bringing up the rear are two SU-85 tank destroyers. These were by far the easiest to assemble, with only the gas tanks needing any sort of care which is mostly just not gluing them to your fingers.

After I assembled and spray painted them, I gave them a brown wash and some minor weathering. Finally I added the PSC decals I bought for this project. I like their decal sheets, but they hardly provide enough stars for what they charge.

As an afterthought, I do have one last unit to add to this force. I need a 45mm AT gun team. I've ordered a blister and will put together two of them to honestly and truly finish these Russians. Now all I have to do is play the campaign!

Saturday, May 3, 2014

15mm WW2: Russian Infantry

I was on fire this week, assembling, basing, and painting the entire infantry force for my 15mm WW2 Russians. This is probably the fastest I've every got anything like this done, considering the models had to be assembled first.  I'll be using these for the Operation Bagration campaign book I plan to start soon. Coincidentally, the force is a copy of the 28mm Russians I did for a Bolt Action paint challenge last year.  The only difference being is I don't have an AT rifle in 15mm and it only took one week to do it in 15mm!

These are all Plastic Soldier Company 15mm plastic Russians. I really like these models, and have enough left over to do another platoon if I choose. I may actually do that, seeing how quickly these came together, though not for a while yet. There are a few Command Decision models here as well.

Going left to right across the picture I have an SMG squad, command squad, Maxim MG, four rifle squads, a forward observer team, medic and rifleman, mortar team.  You can see I paint colors on my bases to distinguish the rifle teams. This helps during play as well as clean up. The angle in these pictures really emphasizes the color, but on the table a lot of times you can't really see it.

Here are a few detail shots. This is the HQ unit. The commander on the left is a PSC model and next to him is a Command Decision model. You can see the PSC are slightly smaller, but otherwise scale well together.

This Maxim MG crew is a Command Decision model. I split a pack of these with a friend, and I still have close to three or so MG teams left over.  I only really need one for platoon sized games.

The PSC box gives you a number of female models, all in the same pose. I've chosen to use this one as a medic. I suppose you could use them as support staff. It would've been nice to have some armed as snipers. Also in the shot are Command Decision models for a forward observer team and the 60mm mortar team.

Finally these are the SMG team. In Bolt Action these guys can be nasty, as long as they arrive in one piece. At the very least they'll absorb ten wounds for your other guys. These are all PSC models and nicely done. The NCO figures for all the PSC models are really weird. They are either in a stiff pose like someone just gave them a suppository or they're covering their heads like this pose on the right. I thought it should be waving troops forward or calling to someone. Nope, they're running for cover, I guess.


This completes all the infantry models I will need for now. I will need to get an AT gun soon, but have had trouble finding just one model and not five. Up next, I have to complete all the armor I will need for the campaign. There are 10 vehicles needed and five are going to the PSC tanks. They'll take forever to assemble, but painting should go quick. Stay tuned for the results, hopefully by next week!

Tuesday, March 18, 2014

Operation Bagration: Germans

I'm still planning on playing through the Operation Bagration campaign byBritton Publishers.  I have to build the entire Russian force from the ground up. So I thought it would be easier first to tackle the additional German units I need for the campaign.

Basically I needed more tanks and other vehicles. I was a bit lazy in researching camo patterns and colors for this campaign. I just did everything to match what I already own. Here's the run down of what I've added.

There are Peter Pig and Battlefront models.  The four soldiers tossing grenades are Peter Pig models. These were not necessary for the planned campaign, but I had the models handy and so painted them. The motorcycle troops are from Battlefront. I have three more in the blister, but since they were a pain in the ass to assemble, I won't bother until I need them. Finally, there's a Kubelwagen from Peter Pig. It had a bunch of interchangeable heads, which was cool. So I made it like a command vehicle, with the brass riding in the back.


This is just a better shot of the motorcycle and Kubelwagen.  Now on to the self-propelled guns.

Both are Battlefront models, with a Hornisse on the left and a Marder III on the right. Interestingly, the campaign book called for a Nashhorn, which I could not find anywhere. Turns out the Hornisse is basically the same thing. Who said miniature gaming was not educational!

More Battlefront tanks here, with a Panzer III on the left and a Tiger I E on the right. The Tiger had a lot of bits to it and no instructions. I was surprised I figured out the assembly on my own. Usually I end up with spare parts that I should not have.

At last we have two Panther G models from Peter Pig. These tanks absolutely suck. They suck hard. They were very expensive, and not worth what I paid. First, there is a visible gap between tracks and hull. I mean light shines through. Next, the turrets don't fit into the hull properly, and one I jammed in so tightly it can no longer move. That's after trying to file the hole larger. Lastly, no amount of glue holds these together. I've scrubbed them down so there's no residue, used a gallon of superglue, and they still fall apart on touch. I hate these models but I'm stuck with them now. Stay away from these.

So there are all the extra Germans I needed to play the Operation Bagration campaign. I won't just use these for the campaign, of course, as they all have application in other games. They were mostly fun to paint. I used Plastic Soldier Company's spray paint for these to speed up the process.  Their German tank colors are too bright for me, but once I apply a wash they look a lot better.

Saturday, January 18, 2014

First Models of the New Year

After a short break from painting models I'm back at it. I've got a lot of miscellaneous stuff sitting on the table to paint. Up first are three vehicles I need for my on-going 15mm WW2 project. They're relatively small and painted up quickly.


Here we have, from left to right, SDKfz 250/7D 8cm Mortar Carrier, Panzer II, SDKfz 234/4 Armored Car. These are all Battlefront miniatures.


The tank is probably the most unique choice here. In my games of Platoon Forward, I often roll up light tank support options and don't have any suitable models.  After some research on what might serve for this in a German list, I found out that the Panzer II was still in use during the late war, albeit in a reduced role for scouting / recon. I tried to research camo schemes for the PZII at this stage of the war, but found nothing but early war stuff. Well, since it's only me, I went with this late war camo thing I've been doing. Made sense to me, anyway.

I also tested Plastic Soldier Company's Dunkelgelb spray paint. I've used Vallejo's Middlestone for this color, but I'm sick of wasting time with brushing on this stuff. The PSC spray paint was much brighter and more intense in color. I have no idea what real dunkelgelb would've been like, but I bet it was quite varied in intensity due to a lot of factors. So, I was happy with it.  I also used their decals which I got at the same time. For what they charged, I'd have liked more decals than I got.

So, not much else to say about these models. I'm at work on more Bones models, working on the fantasy version of "tanks" for my tribe of orcs!

Monday, December 30, 2013

PaK Nests

Here's one of my Christmas gifts this year. I wanted the terrain that comes with this set, but also needed the guns for future scenarios. These are German PaK nests from Battlefront Miniatures. The set actually comes with two Pak 38 and two PaK 40 guns, which makes it an excellent deal. You are only provided enough crew for two guns, but extra crewmen are cheap and easy enough to find.

I decided to do one of each gun, since I'm not using these for Flames of War but for Bolt Action in 15mm. I can also use the nests for other things like mortar or rifle pits. The bases fit in without any trouble, as you can see in the pictures.


I didn't flock the pits, since it's supposed to represent overturned earth, and also because flock makes a mess after constant handing. I'm expecting to get a lot of use out of those nests.

 Again no great shakes, but since this was in keeping with the season thought I'd cram one last entry in before the year-end wrap-up post. I'm not going to get anything else done before the end of the year, so this is it.  Particularly the last third of 2013, it has been a year for 15mm WW2!

Friday, December 27, 2013

Filling in Mortar Holes

.... Holes in my collection, that is. I made a glaring omission in my 15mm Imperial Japanese Army collection, namely a medium mortar team. I had assumed a lot of the scenarios I'd be playing for Operation Stalemate II had the medium mortars off-board. On closer reading, many scenarios have these mortars on the table, and I have no models to represent these teams.

So, Peter Pig and Brookhurst Hobbies came to my rescue. I really like the Peter Pig range, even if they're a little on the expensive side for 15mm. Brookhurst has been great to deal with, and they seem to have all Peter Pig in stock whenever I need it. I can order on a Monday and the models will generally be at my door by Friday.

I also discovered that I left off medium mortars for both my US and German forces, so I ordered those at the same time.  Now I'm covered.  Here are pictures of the completed teams: Japanese, German, and US.


Each pack comes with two complete teams, as you might've guessed. While I don't think I'll ever need two on the table at once it's really no big deal to paint both teams. This is one of the great benefits of 15mm: speed of painting. The models have as much detail as 28mm, except in the faces, but a lot less surface area.

This is sort of random, and I'm only posting because I painted it at the same time as these teams. Here's a Battlefront US Greyhound armored car. I wanted one for use in my Platoon Forward campaign, but didn't have a specific need for it like the mortars. Anyway, I'm sure this will get used eventually.


That's it for this update. I've got plenty of stuff on the table yet to do. I'll be back soon.

Saturday, December 7, 2013

WW2 Pacific Theater Buildings

Quick update this week. I have painted two buildings for the Pacific war. None of my planned scenarios need buildings, but I'm thinking ahead to after this is done. I also have a Saipan campaign book (30 scenarios!) that needs buildings, and I may play some of that one day.

So here are two buildings from Peter Pig. One is a standard "Burmese jungle" style building. The other is the "Poor Samurai" building. I did not order the samurai building, and it was shipped to me in place of the other jungle building. However, I thought I could use this in Okinawa scenarios and so held on to it.  I'll probably continue to paint the samurai building, finishing the exterior framing.

I put some of my Battlefront US leaders next to them for size. (I also painted those three models this week.)  You can see that even with the large size of the Battlefront models they scale nicely. The buildings themselves are nicely done, with removable roofs. However, you can't put anything inside of them.

The jungle building is on metal pylons. You can either glue them on or not, and I elected to leave mine unattached. The two stairs are metal and I also left them unglued. The building has some neat details. After I stared painting it, I noticed coils of rope and a line of fish hung out to dry. It looks better in life than it does in these pictures.

So now I have the start of a small village. I'll get the other samurai building and jungle building from Peter Pig, then look to expand from there.

After completing my big project to get all my IJA and US Marines painted, I was left feeling flat. I wanted to keep going and didn't know what to do next. It's the law of inertia at work: I just wanted to keep painting WW2 models.

I had a blister of 37mm US Anti Tank guns hanging around, and so got to work on them. Since I play only platoon sized skirmishes, I don't really need two AT guns. So I committed a "mini sacrilege" and painted one gun team as US Marines. Not exactly the same uniforms but hunkered behind their gun you can't really tell.

So there you have it. I think I'm now over that inertia and ready to start painting something else. I have a heap of Reaper Bones to work on, and they're up next.

Sunday, December 1, 2013

Operation Stalemate II, Mission One Battle Report

With all my US Marines and IJA forces complete, I am now ready to play the scenarios in Britton Publishing's Operation Stalemate II campaign book. There are 11 scenarios based upon the 1st Marine Division's actions on Peleliu. I will be skipping one of the scenarios (set in the jungle and with a recon dog.... just don't want to bother with it), to play out 10 over the course of several months.

I've gone back and forth on what rules to use for these games. Savage Worlds is awesome for squad level, character based games, but these scenarios jump around in time and don't follow any fixed group of soldiers. Also Savage Worlds requires a ton of prep work and the scenarios here can be big. I was leaning on Disposable Heroes, which has a lot of crunch but gets fiddly with vehicle rules. Also, I don't know these rules so well, and don't want to learn as I go. So at last I settled on Bolt Action.

Bolt Action is almost ideal for these scenarios, as it covers 90% of what I need and is not too complex that I have a lot of weird rules to remember. I like the randomness of the order dice, too. What Bolt Action doesn't do is work at the squad level (there are a few scenarios at the squad level that I want to play), and it doesn't have rules for most of the Japanese defenses like minefields and barbed wire.  So I'll have to house-rule a few things. I'll probably use Savage Worlds for the couple of squad-level scenarios.

The biggest adjustment for Bolt Action is that I'm playing 15mm. I've tried a number of things to fix the scale and none have been satisfactory. (I've been playing Normandy scenarios with Platoon Forward in 15mm Bolt Action.) First I tried cutting all ranges in half, but leaving movement the same.  That doesn't work because once you are in rifle range (12") you are also in assault range and the game becomes broken. Scratch that.  So I did the next logical thing, which is to halve movement. So moving at 3" a turn means you've got to compress the board size or you'll be there all day. OK, next idea. I tried replacing all inches measurements to centimeters (e.g. 12" becomes 12cm). Dear God, just kill me.  That's even shorter than halving all the distances. It is like playing the game in a slow-motion nightmare that never, ever ends.

At the end of the day, I'm playing in 15mm using all the normal 28mm ranges. You know what, it works fine. I know there are those of you out there who just read that sentence and fell the to floor. You're now thrashing beneath your desk, palms pressed into your eyes, and you're screaming, "It burns! It burns! Those ranges are not realistic. The ground scale is wrong. Arrgh! No!!!!!" Well, it's a only a game and if we wanted to go looking for unrealistic shit in our games we'd never get around to playing them.  I combed message boards looking for better "conversion" advice and I heard the ground scale argument a lot. I just am not worried.

OK, onto the game. The first scenario is called H-Hour, where the Marines hit the beach.  My objective is to start at the water edge and get 20 Marines off the opposite table edge, which I've placed 24" away. Here's my force list as given in the scenario book.
  • 1 x LVT (A) 1
  • 1 LVT (A) 4
  • 2 x LVT-4
  • 1x 7 man Platoon HQ (2LT, medic, 5 riflemen) all Regular
  • 3 x 13 Marine Rifle Squads each with 3 BAR & 1 SMG (regular)
  • 2 x .30cal LMG teams (regular & veteran)
  • 2  x 60mm Mortar teams (regular)
  • 1 x Flamethrower team (veteran)
Now that's some firepower! Should be a ROLFStomp for the USA!

Blocking the beach are the following Japanese forces:
  • 2 x Anti personnel mine fields (2x6") -- oh my, no rules for these!
  • Off Board Forward Observer -- crap, nothing about FO teams being off-board in the rules!
  • 2 x Type 92 MMG teams (regular)
  • 1 x 4 man Platoon HQ (1LT and 3 Veteran riflemen)
  • 2 x 6 man fire teams with LMG / Rifles (regular)
  • Fortifications to include coconut log bunkers and rifle pits
So you'll notice that these lists don't necessarily conform to the Bolt Action force organization rules. I don't know how many points this represents on either side. Since these are semi-historical encounters, the lists will reflect history more than game rules.

The minefields are tricky. So I made markers for 4 of them, and put a star on the reverse sides of two of them. Any troops that enter the minefield will take hits like a flamethrower, but not be subjected to the morale test destruction (that just seems over-powered for a minefield).  Once movement is over, I can flip the minefield to see if it was real or not. The off-board FO just added a die to the cup each turn, but couldn't be eliminated. Easy as that.

I also added an extra die to the cup for random events. When I pulled that die, I rolled it and on a 6 I'd have a random event. No random events happened in this game.

OK, turn one you see the layout of the board. All troops are aboard one of the two LVT-4s (with the open backs). The Japanese are all in hidden status and set to ambush, per their special rule.  The US has the unimaginative layout you see here. The Japanese MMGs are in the log bunkers that bracket each side of the table. I'm playing a 48"x24" table.

Here's another shot of the Japanese lines.  Set up for them was easy, as it's provided in the book. Honestly, as a two player game this would suck to be Japanese. All you do is try to block the beach exit and then roll dice whenever the US moves. Otherwise, not much to do for them except die.

The Japanese have a prelim bombardment that is actually fairly effective. It puts two pin markers on most vehicles and very nearly destroyed the LVT A-4. I got lucky on the damage roll or it would've been blown before the game started.

To make a very long turn one much shorter, my guys disembarked and advanced across the beach. The beach is rough ground, so no running. I threw tons of fire at the Japanese and hit a few to reveal them from hidden status.  I used a little exclamation marker to indicate who was NOT hidden after taking a hit. Once everyone was revealed, I dumped that marker.  I just wanted to use those markers!

By the end of the first turn, I guessed I'd have the game won by turn three. My guys were looking good.  I chanced moving one of my units into a minefield, as the beach was crowded otherwise. Would I make it?

Ha ha! Lucky bastards! Nope, this was not one of the two minefields, so I pulled it out and these guys were good to go. I felt so confident that I tried it again on the right flank. Oops. That was real. And it was right in front of the MMG in the bunker and the Rifle and HQ squads of the Japanese. And it killed a lot of my guys. Crap.

Here's the disposition of  my guys at the end of turn one. The LVT A 4 and LVT A 1 are hanging back to provide fire. The 60mm mortars would try all game to lay smoke in front of the MG bunkers, but would miss and the smoke would dissipate the next turn. Smoke was a real let down.  Also, you'll notice the ominous aiming token for the IJA's artillery strike in the center of the board. Turn two could be interesting.


Well, turn two was interesting. The artillery strike flat-out destroyed the flamethrower team... poof they're dead. All other teams within 8" of that aiming point took 2-3 pin markers each. The HQ team was not in the right place, and so when it came time to rally, no one did. All I managed was to get shot up by MG fire. The only saving grace was the Japanese on the left flank kept their heads down too.

I didn't even bother taking pictures of turns 2 - 4, as my guys failed rally test after rally test. The two squads were frozen at the edge of the beach on the left, and on the right that squad evaporated to concentrated fire. The medic didn't save anyone.  My two armored support units were both pinned from the prelim bombardment, and the LVT A 1 on the far left didn't rally until the final turn! However, over the course of this horrifying time, the MG teams and mortars wore down the IJA fire team and HQ on the right. Sadly, my 2LT was killed (due to excessive damage from the MMG on the right). I could not answer the bunkers, because I couldn't blind them and couldn't hit them. Firing into a bunker is impossible!

Here are my guys just before the end of turn four when the LT died (he's to the right of the squad, wearing the soft cap with hand up). If they don't start to rally, I will lose the scenario. With the LT dead, my chances are even lower!


By turn five my LVT A 4 howitzer was back in action and blew up the remaining IJA fire team. I only had the MG teams at either side of the board. I started running units off the table, and jumped for joy with one of my two remaining rifle squads rallied. The last one never did and the MGs chewed them up until I realized I could move the LVT-4s to block the MG LOS!  DOH!  Anyway, once they started to pass tests, it got easier. I literally needed turn 7 (based on a random die roll at the end of turn 6 to continue), so that my medic could run off board and complete the needed 20 soldiers. I won but just barely!

Here's my line at the end of the game.


It was a lot of fun and I'm looking forward to the next scenario. That one will basically be the same thing only with Sherman tanks coming ashore and facing AT guns.

15mm Pacific War Complete

I probably could have got a few blog posts out of this batch of models, but I just got lazy. Plus, I don't believe people want or need an update from me every time I paint something. However, this last batch represents a milestone for me. It completes both my US Marines and Imperial Japanese Army forces!

Here's what I've got done. We'll start with the US Marines.


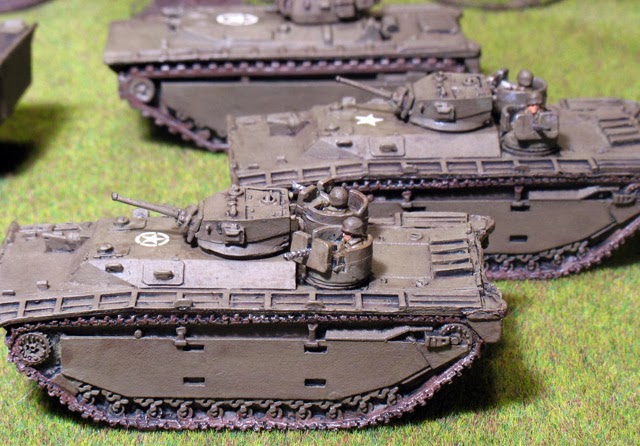
These are the various landing craft for my Marines. The top picture shows  all five LVTs. Leading the way (from the left) are two LVT 4 Buffalo, which are basically big troop transports with guns. Behind is an LVT (A) 4, which has the howitzer mounted in the open turret. The close up shots show two LVT (A) 1, Alligators, which have AT guns and MGs. 

The Alligators and Buffaloes were from Old Glory, and are solid resin pieces except for MGs and the turrets. The LVT (A) 4 is from Quality Casting. It's a solid hunk of metal, and was easy to assemble. My only complaint is that the deck and hull did not join and had huge gaps that required a lot of putty to fill.

You'll notice I slipped in some palm trees from Pegasus Hobbies. While I don't have a lot of jungle terrain, most of Peleliu was a coral wasteland of shell craters. Sure there was jungle, but most of my scenarios won't take place in them. So, the palm trees will do the trick for now.

Peter Pig 60mm mortar teams for the Marines. Nothing to write home about.  These guys round out the Marines.  I had forgotten to order them a while ago, and had to do a little catch up.

Moving on to the Japanese, we start with the armor.


The top picture shows two platoons of Type 95 Ha-Go tanks. These are the Battlefront models and as such they're on the bulky side. Assembly was easy, except gluing on  the MGs. These ended up getting glued to my fingers.

The second picture shows a comparison with Battlefront and Quality Casting. The QC tank is significantly smaller. It is also more detailed but a little bit more work to assemble than Battlefront. Still Battlefront leaves you no choice if you want two platoons, as they don't sell single blisters of the tanks.


Finally, here's the Japanese gun teams I needed. These are all Quality Casting models. I'll just say right away that these models suck.  They must be true 15mm, as they are tiny next to everything else I have, including Peter Pig.  The proportions are screwed up, too. If you look carefully, you'll find kneeling models that are as tall as standing models.  Really?

So besides looking like ass, they get the job done. The top models are Type 1 47mm anti tank guns and crew.  Beneath that is a 75mm mountain howitzer with extra crew. I did extra crew because some scenarios I plan to play call for larger than usual gun teams. Otherwise I added gun crews based on what their "normal" crew should be.

So that wraps it all up! I've been working on and off getting these painted over the last few weeks. Next, I'll play my first scenario with these forces. I'm excited to get them to the table.

I was going to take out all the models and do a nice group shot, but then realized what a pain that would be. So instead feast your eyes on a fuzzy, dark picture of both armies in their storage containers!


Saturday, October 19, 2013

15mm WW2: More Marines

Another slow week at the painting table has passed. I finished several support units for my US Marines, four bazooka teams, two flamethrowers, and three .30cal water cooled MGs.  Here's the whole lot of them.

Click for a larger picture with more details.


Not much to write home about here. I realized I didn't order my mortars, so they're on the way.  These are all Peter Pig models. They don't scale so well with my Command Decision models, but nothing so bad that it becomes distracting.

Bazookas and flamethrowers need something to assault, so I painted my MG bunkers from Battlefront.


Nothing too spectacular here. I didn't really know how to weather the concrete, so I just left them with a fairly crisp paint job.  After they were done, I realized that these terrain pieces are quite small even for 15mm.

Here's a comparison with a Peter Pig model, which is a lot smaller than Battlefront's models.  The marine is out of focus, but you cans see the scale.  He looks passable outside the log bunker.


He starts to look a little small in front of the concrete bunker.


But if you flip the bunker around to see the door, the marine looks like a giant!


So what was Battlefront thinking when they designed these pieces?  That door is not big enough for a 15mm model's foot, never mind an MG team.  It looks more like a 6mm scale.

I won't let that prevent me from using the bunkers, but it was really disappointing when I found how small these bunkers actually are.  That kind of scale discrepancy throws me out of the game, but only when I pay attention to it.  I'll just have to not look too carefully, and I do have other terrain pieces that aren't really to scale.  It's all just meant to be a representation, anyway.

That's all for WW2 right now, though I'll be quickly returning to it. In the meantime, I'll be working on some Malifaux figures, and likely gluing my fingers together in the process.

Sunday, October 6, 2013

15mm WW2: Japanese Reinforcements

Quick update today on my 15mm WW2 project. I'm gearing up to start my next campaign, which will take place in the Pacific. Specifically, I'm building forces to match the needed figures for Britton Publishing's excellent campaign book, Operation Stalemate II. This is the 1st Marine Division's battle for Peleliu in 1944. I'm looking forward to it.

So, here's what I've got done this week.

Working left to right: eight knee mortars; the standing guys look like they've got leaf blowers instead of mortars to me. Next are three suicide bombers. They've got explosives strapped on their back and have a detonator in their hands, sad and gruesome models. I painted up three flamethrowers, though they aren't needed for the scenarios. Behind the flamethrowers are two models with antitank bombs on poles.  Finally, there are three heavy machine gun teams.

These are all Peter Pig models. I used Command Decision models for my main force, and these Peter Pig models are really small in comparison. The Command Decision models are significantly larger and don't mix so well.  In any case, these are specialists and not included in every scenario, so it's no matter.

To complete my Japanese I need some AT and infantry guns along with some light tanks. The tanks are proving hard to come by, even though Battlefront makes them. These tank models don't seem to be in stock anywhere.

On to the US Marines next!

Saturday, August 24, 2013

15mm WW2: US Marines

Here is the core of my newly painted 15mm US Marines for WW2.  These models took a lot longer to paint than I expected. Longer work days and shorter evenings for myself contributed to the delay. I completed 4-5 models whenever I had the time, and eventually completed the platoon.

I went with Old Glory's Command Decision for the models. Here they are. Click for a bigger picture with more detail.


You're looking at three rifle squads and a platoon command with some extras. Totally there are 52 models in the main force. A full squad was 13 soldiers, comprised of a squad leader and three fire teams of four soldiers. Each fire team had a BAR, which you can see in the pictures above.Once I add in LMGs, these guys are going to put out serious fire power.

There are not a lot of painting guides for WW2 Marines out there. Every reference picture I find has them in different colors. I eventually settled for what you see here. Their uniforms concerned me the most. Ironically, they're painted in Vallejo Model Color's Russian Uniform. The rest of the colors are pretty standard stuff.

The command squad is a mish-mash of leader models from the leader pack. I liked that you got a lot of models, both soldiers and grunts, in soft caps. I used a few for my leaders.  Anyway, here's a peek at some of the command squad.


There were a few models that looked like potential Corpsmen (medics). I painted the red cross on them, but in reality I don't think a Corpsman fighting the Japanese would mark himself out so boldly. The Japanese were trained to kill leaders and medics as priority targets.  However, to make the medic easier to find on the table, I painted the red cross.

Otherwise, there's a lot of great models in the Marines leader pack. Above you see one with a walkie-talkie. I paired him with a regular grunt, who helped fill out the command squad.

That's about all I can say for these guys. I have a bunch more US Marines to paint: 8 combat shotguns, 3 .30 cal MGs, 2 60mm mortars, flamethrower teams, and casualty markers. I'll have to give these guys some landing crafts before I can call them done.  Armor from my other infantry force can be used for the Pacific, so that saved me time and money. 

In the meantime, I'm going to give myself a break to work on my Reaper Bones models.  Then I'll finish the Marines and their Japanese opponents. I'm hoping to start the Peleliu campaign book by fall.