Showing posts with label Battle Report. Show all posts

Sunday, December 1, 2013

Operation Stalemate II, Mission One Battle Report

With all my US Marines and IJA forces complete, I am now ready to play the scenarios in Britton Publishing's Operation Stalemate II campaign book. There are 11 scenarios based upon the 1st Marine Division's actions on Peleliu. I will be skipping one of the scenarios (set in the jungle and with a recon dog.... just don't want to bother with it), to play out 10 over the course of several months.

I've gone back and forth on what rules to use for these games. Savage Worlds is awesome for squad level, character based games, but these scenarios jump around in time and don't follow any fixed group of soldiers. Also Savage Worlds requires a ton of prep work and the scenarios here can be big. I was leaning on Disposable Heroes, which has a lot of crunch but gets fiddly with vehicle rules. Also, I don't know these rules so well, and don't want to learn as I go. So at last I settled on Bolt Action.

Bolt Action is almost ideal for these scenarios, as it covers 90% of what I need and is not too complex that I have a lot of weird rules to remember. I like the randomness of the order dice, too. What Bolt Action doesn't do is work at the squad level (there are a few scenarios at the squad level that I want to play), and it doesn't have rules for most of the Japanese defenses like minefields and barbed wire.  So I'll have to house-rule a few things. I'll probably use Savage Worlds for the couple of squad-level scenarios.

The biggest adjustment for Bolt Action is that I'm playing 15mm. I've tried a number of things to fix the scale and none have been satisfactory. (I've been playing Normandy scenarios with Platoon Forward in 15mm Bolt Action.) First I tried cutting all ranges in half, but leaving movement the same.  That doesn't work because once you are in rifle range (12") you are also in assault range and the game becomes broken. Scratch that.  So I did the next logical thing, which is to halve movement. So moving at 3" a turn means you've got to compress the board size or you'll be there all day. OK, next idea. I tried replacing all inches measurements to centimeters (e.g. 12" becomes 12cm). Dear God, just kill me.  That's even shorter than halving all the distances. It is like playing the game in a slow-motion nightmare that never, ever ends.

At the end of the day, I'm playing in 15mm using all the normal 28mm ranges. You know what, it works fine. I know there are those of you out there who just read that sentence and fell the to floor. You're now thrashing beneath your desk, palms pressed into your eyes, and you're screaming, "It burns! It burns! Those ranges are not realistic. The ground scale is wrong. Arrgh! No!!!!!" Well, it's a only a game and if we wanted to go looking for unrealistic shit in our games we'd never get around to playing them.  I combed message boards looking for better "conversion" advice and I heard the ground scale argument a lot. I just am not worried.

OK, onto the game. The first scenario is called H-Hour, where the Marines hit the beach.  My objective is to start at the water edge and get 20 Marines off the opposite table edge, which I've placed 24" away. Here's my force list as given in the scenario book.
  • 1 x LVT (A) 1
  • 1 LVT (A) 4
  • 2 x LVT-4
  • 1x 7 man Platoon HQ (2LT, medic, 5 riflemen) all Regular
  • 3 x 13 Marine Rifle Squads each with 3 BAR & 1 SMG (regular)
  • 2 x .30cal LMG teams (regular & veteran)
  • 2  x 60mm Mortar teams (regular)
  • 1 x Flamethrower team (veteran)
Now that's some firepower! Should be a ROLFStomp for the USA!

Blocking the beach are the following Japanese forces:
  • 2 x Anti personnel mine fields (2x6") -- oh my, no rules for these!
  • Off Board Forward Observer -- crap, nothing about FO teams being off-board in the rules!
  • 2 x Type 92 MMG teams (regular)
  • 1 x 4 man Platoon HQ (1LT and 3 Veteran riflemen)
  • 2 x 6 man fire teams with LMG / Rifles (regular)
  • Fortifications to include coconut log bunkers and rifle pits
So you'll notice that these lists don't necessarily conform to the Bolt Action force organization rules. I don't know how many points this represents on either side. Since these are semi-historical encounters, the lists will reflect history more than game rules.

The minefields are tricky. So I made markers for 4 of them, and put a star on the reverse sides of two of them. Any troops that enter the minefield will take hits like a flamethrower, but not be subjected to the morale test destruction (that just seems over-powered for a minefield).  Once movement is over, I can flip the minefield to see if it was real or not. The off-board FO just added a die to the cup each turn, but couldn't be eliminated. Easy as that.

I also added an extra die to the cup for random events. When I pulled that die, I rolled it and on a 6 I'd have a random event. No random events happened in this game.

OK, turn one you see the layout of the board. All troops are aboard one of the two LVT-4s (with the open backs). The Japanese are all in hidden status and set to ambush, per their special rule.  The US has the unimaginative layout you see here. The Japanese MMGs are in the log bunkers that bracket each side of the table. I'm playing a 48"x24" table.

Here's another shot of the Japanese lines.  Set up for them was easy, as it's provided in the book. Honestly, as a two player game this would suck to be Japanese. All you do is try to block the beach exit and then roll dice whenever the US moves. Otherwise, not much to do for them except die.

The Japanese have a prelim bombardment that is actually fairly effective. It puts two pin markers on most vehicles and very nearly destroyed the LVT A-4. I got lucky on the damage roll or it would've been blown before the game started.

To make a very long turn one much shorter, my guys disembarked and advanced across the beach. The beach is rough ground, so no running. I threw tons of fire at the Japanese and hit a few to reveal them from hidden status.  I used a little exclamation marker to indicate who was NOT hidden after taking a hit. Once everyone was revealed, I dumped that marker.  I just wanted to use those markers!

By the end of the first turn, I guessed I'd have the game won by turn three. My guys were looking good.  I chanced moving one of my units into a minefield, as the beach was crowded otherwise. Would I make it?

Ha ha! Lucky bastards! Nope, this was not one of the two minefields, so I pulled it out and these guys were good to go. I felt so confident that I tried it again on the right flank. Oops. That was real. And it was right in front of the MMG in the bunker and the Rifle and HQ squads of the Japanese. And it killed a lot of my guys. Crap.

Here's the disposition of  my guys at the end of turn one. The LVT A 4 and LVT A 1 are hanging back to provide fire. The 60mm mortars would try all game to lay smoke in front of the MG bunkers, but would miss and the smoke would dissipate the next turn. Smoke was a real let down.  Also, you'll notice the ominous aiming token for the IJA's artillery strike in the center of the board. Turn two could be interesting.


Well, turn two was interesting. The artillery strike flat-out destroyed the flamethrower team... poof they're dead. All other teams within 8" of that aiming point took 2-3 pin markers each. The HQ team was not in the right place, and so when it came time to rally, no one did. All I managed was to get shot up by MG fire. The only saving grace was the Japanese on the left flank kept their heads down too.

I didn't even bother taking pictures of turns 2 - 4, as my guys failed rally test after rally test. The two squads were frozen at the edge of the beach on the left, and on the right that squad evaporated to concentrated fire. The medic didn't save anyone.  My two armored support units were both pinned from the prelim bombardment, and the LVT A 1 on the far left didn't rally until the final turn! However, over the course of this horrifying time, the MG teams and mortars wore down the IJA fire team and HQ on the right. Sadly, my 2LT was killed (due to excessive damage from the MMG on the right). I could not answer the bunkers, because I couldn't blind them and couldn't hit them. Firing into a bunker is impossible!

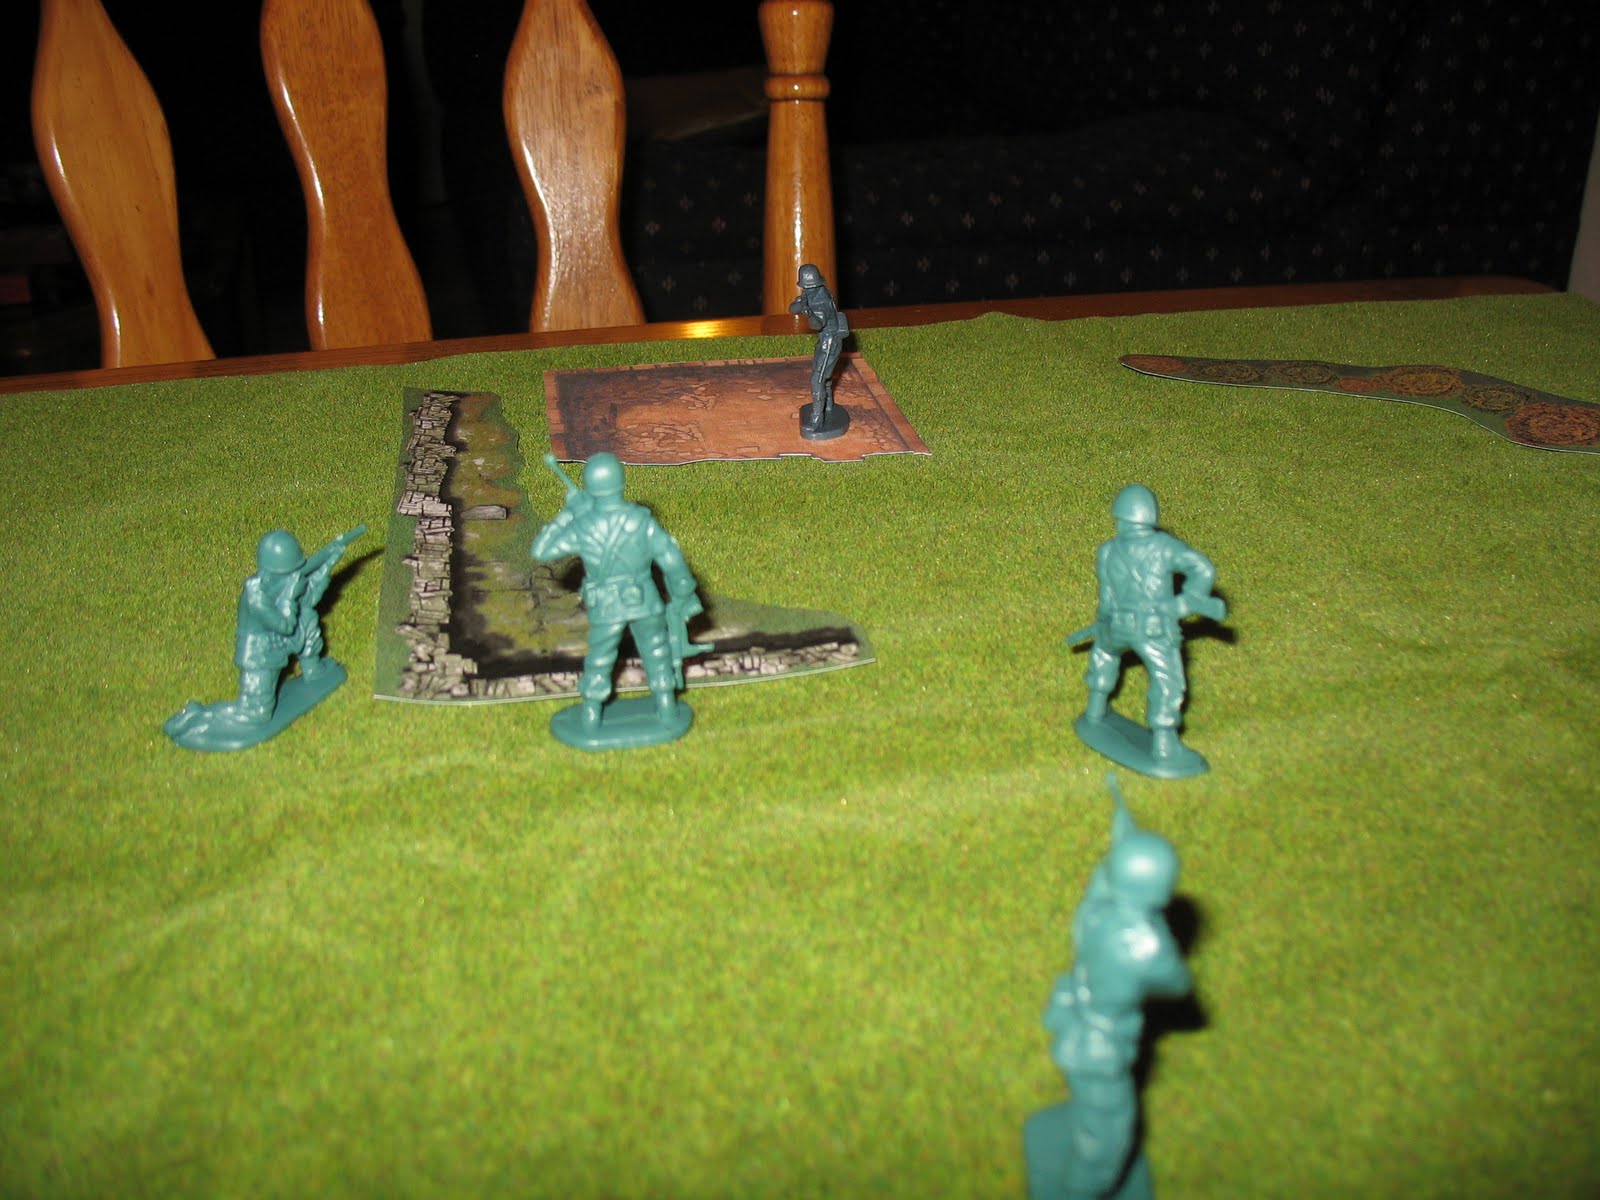
Here are my guys just before the end of turn four when the LT died (he's to the right of the squad, wearing the soft cap with hand up). If they don't start to rally, I will lose the scenario. With the LT dead, my chances are even lower!


By turn five my LVT A 4 howitzer was back in action and blew up the remaining IJA fire team. I only had the MG teams at either side of the board. I started running units off the table, and jumped for joy with one of my two remaining rifle squads rallied. The last one never did and the MGs chewed them up until I realized I could move the LVT-4s to block the MG LOS!  DOH!  Anyway, once they started to pass tests, it got easier. I literally needed turn 7 (based on a random die roll at the end of turn 6 to continue), so that my medic could run off board and complete the needed 20 soldiers. I won but just barely!

Here's my line at the end of the game.


It was a lot of fun and I'm looking forward to the next scenario. That one will basically be the same thing only with Sherman tanks coming ashore and facing AT guns.

Sunday, May 19, 2013

Solitary Soldiers Campaign Progress

As I mentioned a few posts back, I've been getting in some solo or co-op games following along with Britton Publishing's Solitaire Soldiers campaign book. There are ten missions, which I'm going through in order, which start from D-Day and follow a squad of 12 men through three months in 1944 with the 29th Infantry Division.

I've just completed the fifth scenario, this one solo (my son is my co-op partner, and he's in and out). I've been using Savage Worlds (Savage Showdown, actually) as the rules set. These rules are awesome for these kinds of scenario driven games. They have their downsides, but overall I think they fit the bill.  Showdown is incredibly deadly, and solo/co-op friendly.

Seeing how I'm halfway done, I thought I'd share a peek into the campaign diary I'm keeping. I take pictures during the game and jot down notes so I don't loose anything later on. When all 10 scenarios are done, I'll probably print the diary and bind it. I'll also link it up online, but doubt anyone but me would find it interesting.

So right after this, will be the excerpt from the diary. There are three parts to each entry. There's the set up that I copy right out of the book. Then there's a POV after action report I do as the player character. (The writing is pretty lame; I don't put much effort into it, since it's just for me really). Finally, I'll record casualties, victory outcomes, and any other notes. Right now, the diary is up to 23 pages, but that's with lots of pictures.

Be warned, there's lots of reading ahead! 

Mission Five: Self Propelled Gun


Something startles Kiefer from a deep sleep. He brushes the dirt from his face, closes his eyes and settles back into a rhythmic breathing pattern. Suddenly, more dirt falls on his cheek and he swats the air. This time he sits up, annoyed that his sleep has been interrupted. He holds his breath to listen for the source of his discontent. He hears the birds and a few insects, but nothing more. Then dirt from the top of his foxhole breaks off all around the perimeter, and he feels the ground begin to tremble. Then he hears the distinctive sound of clanking treads. The continued tremor from the massive weight of several armored fighting vehicles causes him to peer out of his cover.

Kiefer rises and whispers, “LT?” With no response, he says it louder, “Lieutenant, I hear enemy armor!” The men begin to scramble for their weapons and one soldier yells, “Tiger!” As the squad scans the road, a large self-propelled gun is observed following a half-track. Closer examination reveals a Sturmhaubitz 42. The half-track most likely contains a security element. They seem to be unaware of the squad’s presence and are moving to establish an artillery position that will enable the SP gun to fire on the Battalion CP.

As the Panzergrenadiers disembark and take up defensive positions, the StuH 42 comes to a stop just to the left of the half-track. The tank commander opens his hatch and stands up tall in the cupola with his binoculars. He scans the horizon and calls out coordinates to his gunner.

After Action Report (POV is PFC Dickie Summers)

The early morning sun was at our backs, and probably made it hard for the Germans to see us. They had cruised past, one Tiger and a halftrack.  Hollis told me later it was an infantry gun called a StuH. They all look the same to me.  We were on patrol in a hilly patch of land, following a road and scouting for Gerry, and he ended up driving right past us.

 Lt. Freeman (we still haven't taken to calling him Curly to his face) lined us up behind a hill and sent Jay Shannon up it to see what the Krauts were about. We call Jay "Shy Shannon" on account of his not saying much, but he had a lot to say after he had a look. The StuH had stopped on top of an outcrop and the halftrack was unloading a squad of Panzergrenadiers. 


Lt. Freeman broke us into a fire and maneuver team.  The maneuver team included me, Shy Shannon, Kiefer (with the rifle grenade), Cpl Becker, and Allen Owen. My job was to kill the tank commander and hopefully stop that tank from taking action. Keef and the others would lay down fire on the Panzergrenadiers and hopefully chase them off.  The LT and Sgt Markham would take the rest of the squad to a ruined farmhouse and create a firebase to cover us while we tried to flank the Germans. 

Sounded like a plan from boot camp. What could go wrong?

I got off my shot and the German TC slumped over in his cupola. The rest of the crew bailed out. Keef and the others didn't do as well. The Krauts were in a cluster by their halftrack, but Keef's rifle grenade went wide. They spotted us right away. To make it worse, we were on the hill with no cover.


Despite the fleeing StuH crew, the Panzergrenadiers went to work. They turned their halftrack around and used it for cover, while a team of them slipped into the hedgerows along the road to get a firing position on the hill.
 
With all the German MGs we were torn up pretty bad on that hill. We had to hit the dirt. Owen went down right away. He didn't even cry out, just collapsed like a sack of potatoes. Sgt Markham and the BAR weren't doing much to relieve pressure on us. Their position didn't give a good view of the Germans, though they managed to snipe a Kraut officer hiding behind the halftrack.

The hill was a goddamn nightmare.  The entire German squad had us pinned. Keef fired a few grenades, but both went wide. Too much lead whizzing overhead to line up a shot.  A bullet grazed my helmet and I went blank from fear. I actually thought I was dead. I'm sure it wasn't long, but in that time Corporal Becker was rolling on his back while Shy Shannon lay face down with blood pumping into the grass. Only Keef seemed to have it together. But that wasn't going to last. I started saying my prayers, hoping someone was listening to me.


 And He was. An M10 TD showed up. Sgt Markham had friends in the tank destroyer platoons, and I suppose somehow he managed to have one in the area. I don't ask too many questions about lucky breaks.  That it showed up when it did is a miracle.

The StuH crew, seeing how well the Panzergrenadiers were doing, decided to jump back into their tank. Our TD had a shot at its rear armor. That TD was flying ahead like it knew just where to go. I kept down, but raised my head enough to see the TD take a shot and miss.  The StuH started to lumber around to face its gun toward the farmhouse.

Doc Anderson had sprinted across the open field for us up on the hill. Looking back, his brave run probably saved his life. The Krauts were more aggressive now that their tank was back.  Corporal Becker raised his head to shout something to me.  I crawled back to hear him over the noise. My shoulder and left leg burned with fire, and I felt like Joe Lewis had used me for a punching bag.  Becker screamed and rolled down the hill.  Keef dragged me back down the slope, while Doc worked on the others. He was a true hero, standing out there while the Germans shot at him, working on the wounded like nothing more than mosquitoes were flying around him.


The StuH lined up a shot on the farmhouse and blew the top floor to pieces. Charlie Mayer and Hollis Woodard were up there. Charlie had the BAR and so drew the StuH fire. The halftrack crew used their MGs to keep up the pressure, and Sgt Markham got hit as well. I thought we were going to break off, but we held.

Our M10 angel came through for us. I could hear the TD commander shouting for his gunner to hurry up. The moment they lined up their shot, I heard a gigantic clang and the StuH went up in flames.

The Krauts decided they had enough with a fresh M10 and no anti-tank capabilities. They pulled out, firing as they went. Lt. Freeman wisely didn't pursue them. We didn't have the fire power to handle them, and so Gerry slipped away. 

Without that M10 to shift the tide, I don't think I could be giving you this report. As it is, I'm going to be laid up for a while as these wounds heal. I'll never know the name of the place where we fought, but I won't soon forget that hill and all the blood my buddies and I left on it that day.

 Casualty Report
KIA: Sgt Paul Markham, Pvt Allan Owen, PFC Charlie Mayer,  Pvt Jay Shannon
WIA:  Cpl Gene Becker
WIA (fit for duty): PFC Richard "Dickie" Summers, Pvt Hollis Woodard

Mission Outcome: Draw (2xp) StuH eliminated, 2 enemies killed

Notes: PFC Richard Summers awarded Purple Heart and promoted to Corporal.  Congratulations, soldier!

Now only three soldiers survive from the original D-Day squad.

Sunday, May 27, 2012

15mm Sci Fi Vehicles

When Rebel Minis had a sale a few weeks ago, I picked up a some items to round out my 15mm forces. I needed vehicles to give some variety to the foot troops that I had collected.  Here's what I've got.

These are supposedly APCs, though they look more like tanks to me.  I struggled a bit with a camo scheme, since I wonder if camo would add value in a futuristic setting. But I decided they'd probably do camo for low tech enemies.  So this is the scheme I devised.


Next up is something like a dune buggy of sorts. It's the Earth Force Gila, but the model comes with a Sahadeen driver.  I thought this looks like something those guys would drive, and added him as the driver instead.  I don't think he's clearly visible in the photo. It was a nice kit, with three weapons options.


Finally every sci-fi army needs a walker! Actually every sci-fi army needs multiple walkers! I only got one to test things out.  I'd love to do armies of nothing but walkers, which would work in 15mm. I just needs good rules for something like that. I painted this walker in an urban camo scheme, and had a lot of fun weathering it.


So with all these 15mm sci-fi guys running around, I wanted to get them on the table. I tested out a game of FUBAR for 15mm sci-fi, which also had supplemental Rebel Minis rules.  At one page per rules set, for free, it's definitely something worth trying.

I won't go into a detailed report. I played Sahadeen and my opponent played Earth Force marines. The Sahadeen are really weak, and while EF Marines aren't "all that" they are a lot better than Sahadeen.  The FUBAR rules have some interesting mechanics in activation as well as reaction.  Because the Sahadeen were rated as "Green" troops they didn't activate much and tended to stand around and get shot to bits.  When they did shoot, they almost always missed.  I'm not sure I'd play this version of FUBAR again given some of the imbalances.  But for what I paid to get the rules (nothing) and for the time invested in reading them (10 mins, while we were playing) it wasn't all that bad.

Here are some pics.  My Sahadeen (foreground) activated a couple of times and missing their enemies in the wood and getting shot to bits in return.
 Earth Force Marines hide in cover from a withering hail of Sahadeen fire.... which always missed.  Why hide?

We called the game since EF had suffered one casualty to about 15 of my own, as well as destroying my buggy.  But still, the figures looked good on the table!  I'll just need a different rules set for them.

Saturday, April 28, 2012

Dust Warfare: Initial Impressions

Last night I got together with a friend to play Fantasy Flight Game's Dust Warfare.  I had been waiting for this game to come out, since I really like the models. About a year ago I picked up the Dust Tactics board game based strictly on the models.  The board game was fun. But I didn't play it that often. I was hoping the new miniatures rules would give these figures a new life.

I don't actually have the rulebook. So my friend laid out the game rules for me and I tried to keep it straight in my head.  I'm really better off learning things by playing through a few rounds.  The game had some interesting ideas and rules that I've seen in other games.  Tops for me is initiative rolls for each turn that are based upon how well you are doing in the game.  I also like the command phase, which I'll try to explain below.

We only played one game, and didn't get to every rule. For example, we never did any sort of assault, which is usually a big part of the these types of games.  I'll try to explain what I remember and what I did during the game. That should give you an idea of the flow, but shouldn't be taken as the "final word" on the rules.

First you pick your force, just like any other game.  There's a loose force organization you conform to, and being a certain type of force brings special abilities. Choosing your platoons is quick and easy.  I only had models from the big starter box.  So that part went fast.  Then you generate a scenario.  This was very interesting and unique. You make some rolls and get points to spend on mission generation objectives. You can end up with a lot of different combinations.  Our game scenario was that we both picked two secret locations that we had to control at the end of the game.

Once you have forces and scenarios, you set up according to the way your scenario dictates. We were in opposing corners for our game.  Then you are ready to start.  You roll initiative, using one die for each unit you have on the table.  Every "hit" is totaled and the one with the highest total goes second... which is advantageous in this game.  (I forgot to mention you use their special dice with hits or blanks.... but same thing can be done with regular dice by just counting 1 & 6 as hits)  The total of your hits also determines how many orders you can give in the Command phase. Which brings me to.....

...the Command phase, which comes next. In this phase your leader issues orders to any unit within 12". He has as many orders as he has "hits" from the initiative phase. During the normal turn, your units can take two actions which could be: double move, move & shoot, shoot & move, or double shoot. During the Command phase, you can take one of these actions if you want. So you could shoot once or move once.  The key difference is your opponent cannot react to anything you do during the command phase.  During the normal turn, if your unit comes within 12" of an enemy, the enemy can react by interrupting your action. But there's one last thing to know about the command phase.  If you get an order during this phase, you cannot react during the normal turn.  That's a very important consideration.

Once the command phase is over, where both sides issue orders if they want, it goes to the standard turn and initiative order. This is basically maneuvering into cover, shooting at stuff, trying to get your objectives.  The shooting mechanic is pretty easy.  You consult your roster and see what your weapons do to the type of enemy you're shooting.  If you hit anything, the enemy will get saves which are modified by hard or soft cover. Nothing really different for an experienced war gamer.  I will say that for the most part the fighting was straight forward, uncomplicated, and fun.

When your unit gets hit, it takes a suppression marker. If it takes wounds, you pull models that are eligible targets (no shooting around corners in this game). Suppression markers can be removed by passing tests and one can be removed at the start of a new turn. But while you have a suppression marker your unit can only take a single action. Ouch!  If you get more suppression markers than you have models left in the unit, the until breaks and starts to move back toward your board edge.  If they reach your board edge before removing all their markers, they are gone.  It's an interesting morale mechanic that still gives a weakened unit a chance to come back to the game.  It didn't come up with my game, though.

So that is about it for the basic rules.  I'll walk you through the highlights of the game we played last night.  I played Americans versus Germans.  Everything was from the Dust Tactics big box, not the new starter box currently on sale.  We each had three units (called platoons) and two walkers, plus a hero.  There were different special abilities for each side. But the forces were about equivalent, and represent about 100pts.

Sorry for the crappy phone pictures.  I normally take crappy pictures with a different camera.  Here is the set up at the start of the game.  My secret objective is the big center building plus another building off camera to the right.  I have to control them at the end of the game for added points.
After a turn it's obvious the Germans also want that center building.  You can see them cutting across to another building in their corner.  I advance my Ranger and Recon platoons up with my Hot Dog flamethrower walker for support. My big gun, Pounder, stays put to get a good firing position while my BBQ Squad (close combat assault with flamethrower) cuts out of this picture to grab my other objective.

Over the next turns my platoons in the middle exchange fire with Germans coming from the other side. Once the Germans get within 12" my grenade launchers wreak havoc with them. My Rangers get shot up pretty bad but manage to hang on.  Hot Dog takes some hits; you can see wound markers in the second picture. But he cuts over to the German second objective and burns them out of their building.  In fact, Flamethrowers are more powerful against vehicles.  But Hot Dog still did his job!

The battle continued with the big gun walkers dueling across the battlefield.  In walker combat, whenever you take a hit you roll on a damage table in addition to taking wounds.  We didn't remember that until later.  By that time, Pounder lost his duel with the German big gun walker and was destroyed.

Here you see some of my forces hustling across the view of one of the German walkers.  Luckily the walker couldn't react to us, being out of 12" range! 
By the end of the fight I had lost my big gun walker and one of my platoons had been reduced to one man.  On the German end, there were only the two walkers and the lone hero.  We called the game there with a victory for the Americans!
I love these models and the whole "Weird World War Two" theme!  The rule book was a nice hardback with full color slick pages.  I will definitely be investing in the rulebook, and plan to pick up at least two command platoons for each force.  Looks like I'll have to start painting these models soon!

Tuesday, February 21, 2012

Gathering in the Desert 2012

I attended the 5th annual Gathering in the Desert (GitD) this weekend.  This is one of the best gaming tournaments you'll ever attend.  It's two days of Lord of the Rings gaming on some incredible tables. The scenarios are fun and the competition is tough but friendly.  I'm lucky to have this event happening right in my backyard.  We have people come from all over the country to participate.

Well, despite having a camera phone in my pocket the entire time, I took exactly no pictures (unless you count the picture I accidentally took of my nostrils while messing with my phone).  I attribute the lack of pictures, honestly, to the fun I was having and the concentration on my games.  I never thought of photography.  Keep an eye on the blog link above, and I'm sure Tim will have pictures posted.

Overall, I came in 8th place.  That's the best I've ever done.  I played a 600 pt force of Far Harad supported by Corsairs with spears.  They are a "one trick pony" style of army.  When I can pull off the trick, they perform fantastically.  Otherwise, they don't do so well.  They can, however, get punched in the face for a while.  That's why I had so many drawn games.  I tallied up three draws, one major victory, and one minor loss.  I did solidly in sportsmanship (I didn't swear or throw any punches) and appearance (wore fresh clothes each day), which helped cement my spot in the top ten. Not having some serious out of town competition around also let some of us mid-listers float up a bit this year.

With the changes in the new books, this was probably my Far Harad army's last ride.  I'm OK with that, as I'm tired of it at this point.  I want something different.  Let's review the games that formed their farewell tour.


Game One:  This was "The Artifact" scenario played on the Osgiliath table.  I faced High Elves.  This is a modified "Seize the Prize" scenario from the Legions of Middle Earth book. I had to dig up and carry the artifact off the enemy table edge.  My army got the artifact first, and the Elves sealed off every avenue to their table edge while I did that.  A huge brawl ensued and in the end my army broke and the Mahud King died.  He dropped the artifact and the Elves picked it up.  But time was called, and it was only a draw.  Whew!

Game Two: This was a straight up game of Domination on the Balin's Tomb table.  If you followed the above link you'll see the board and think that it's wide open. Believe me when I say that's an optical illusion.  There's very little LOS on that board.  I played it last year too; so I speak from hard experience.

I faced Gimli and his Dwarf buddies.  I unwisely tried to contest three points and ended up having to concede one and try to shore up my other two holdings.  I was able to retreat because the Dwarfs move slow.  But I had to feed them troops to allow me to do so.  That was all wasted resources.  When time was called, we ended in a draw.  That was a hard game.

Game Three: This was "The Emissary" which is a modified "Storm the Camp."  We each had to escort an emissary into the enemy's camp.  I faced Dol Amroth and Prince Imirhil on the so-called generic table #2.  It was basically both our lines clashing together and doing a meat grinder.  My opponent expected to walk through me like a revolving door.  But Far Harad excels at busting up stuff in close combat.  We fought to a standstill. The Far Harad broke and so did Dol Amroth.  A random die roll ended the game at that point, and so I got my third draw.  In all honesty, if we continued I had a serious risk of losing due to low courage.

Game Four: This was played on day two of the event.  We started with "Bilbo's Treasure."  I faced an Arnor list on the generic table #1.  There are five treasure markers on the table.  You randomly determine which number marker is going to be the treasure.  Then whoever gets to the marker first flips it and sees if they have the treasure.  I got to three markers after a few turns of movement.  It ended up being in my possession and right at the table edge.  I had two guys rush it off the table for a major victory.

But we still had two hours to play.  So we just continued on with a "kill 'em all" scenario where we fought to 25% forces remaining.  Arnor and their dwarf allies put up a great fight.  But Far Harad was in good form for this "fake game" and ripped Arnor into bits.  I felt bad dealing a horrible defeat twice, but we were just killing time.  The men of Arnor would be avenged during.......

Game Five: The final game of the tournament proved to be the most suspenseful of all my games. I played on the incredibly modeled Prancing Pony table.  I faced 59 Woses (Wildmen of Druadan), all with spears and blowpipes.  These were not the shitty Harad blowpipes that are move OR shoot.  These allowed a half move to shoot.  The scenario was "Head of the Snake," which meant my Mahud King had to kill the Woses leader Ghan-buri-ghan in combat to get a major victory.  This wouldn't be so bad but for Radagast floating around the back ranks casting Aura of Dismay and also Transfixing my tough guys.

Well, the Woses lined up a firing line and I dutifully walked into 30+ blowgun darts for three turns.  He couldn't always get all 59 blowguns on me at once, but managed quite a bit.  At first I doubted S2 blowguns would be much to worry about at D5/6 on the Mahud.  But the Woses player was rolling hot and I saw 6 after 6 after 6 come up.  By the time I got to the line, 16 of my men were dead and almost all were Mahud.  I had 5 left to break point.  It was fucking brutal!  I thought the game was done.

But my opponent had miscalculated my Mahud King's wounds, thinking he had already dealt one to me.  So we ended up in a dance with Ghan-buri-ghan and the King each seeking advantage.  There was a lot of nail biting at this point, and I'm not doing the tension any justice in this write up.  In the end, Radagast was out of gas and my King got on Ghan-buri-ghan and slammed four S5 attacks on his naked ass.  He only did two wounds and GBG rolled his Fate to save one.  Then the Mahud hit the break point.

The Mahud King failed courage spectacularly and left.  While I would've thought that to be a draw, since GBG didn't kill him, it was ruled as a kill for the Woses.  I ended up with a minor loss.  It really came to that last Fate roll of GBG.  Despite the loss, it was probably the most satisfying game I played in a while, coming from almost total loss to a real chance to win.  Oh and for what it's worth, when the surviving Mahud and Corsairs hit the Woses line, they tore them to shreds.  So it didn't feel too bad!

So overall it was a great two days.  I thought I'd be tired of LotR but just like last year this event reinvigorated my enthusiasm for the game.  While the new army books have screwed some armies, others got a nice boost.  It's time for me to do something different in LotR.  I tried Elves and detested their pansy play style.  I'm thinking Orcs and lots of monsters.  I want big monsters and ugly evil for my next list.  That's where I'll be headed when my gaming group is ready to pick up LotR again.

Thursday, July 14, 2011

Song of Blades and Heroes Battle Report

As promised, here's a battle report on Song of Blades and Heroes (SBH).  I met up with my friend, Mike, last night and we played a 325pt game.  We played a straight up fight between Orcs & Goblins and Dwarfs.  It was a good old fashioned fantasy stand-by that worked well for this game.

So I was interested in making sure we had a good mix of models.  The Orcs weighed in with one Leader, a Shaman, five Orc warriors and four goblin archers.  The Dwarfs suffer from their elite status when it comes to numbers.  They had a leader, rune priest, an Orc slayer, three warriors, and two crossbows.  We marked off a 3' x 3' area and went at it.  I played Orcs and Mike played Dwarfs.  Mike won the roll off and had me go first.

The first few turns of any game with a "kill 'em all" objective is usually filled with lots of movement.  This was no different.  What makes it interesting is rolling for activations.  Due to my low quality on Orcs, I generally never got more than two and often ended my turn early.  If you fail your activations on two or more dice, you pass the turn back to the other side.  Deciding how many dice to throw for activations becomes an interesting "mini game" of risk management.  It starts from the first turn, so you are actively thinking rather than just moving up models.

Here come the Orcs.  You can see that some models were left at the starting zone because of failed activations.  It was sort of a boon later on, as it turns out.  (All of these are iPhone shots.. which are not too good when it comes to minis.  But you get the idea.)
The Dwarfs use the house at the center for cover.  The orcs will try to go around one side, and send some archers to the other side.  Dwarfs move slower, using the small movement stick of 3".  So Orcs have a speed advantage here.  There's an interesting aspect to movement.  You measure from the front of the model base and move up to the back of the model base.  This is stated in the rules, and is different than the standard GW way of things.  So larger based models go faster.  But they can be engaged by more models as a trade off.

Orc shooting is crap.  You dice off using your combat score, which is low for goblins.  So combined with a low quality (meaning fewer activations) and a poor combat, they don't stand many chances to hit.  A Dwarf crossbow dueled with my night goblin almost all game.  Shooting in this game is more effective than LotR but not as deadly as WHFB.  It's about the middle ground, which is nice.

Eventually the first Orc charges up around the house.  Because you move in straight lines, it takes a lot of activations to run around a corner and fight.  I manage to get him into combat, but he doesn't have enough activation to fight.  It's OK, because he can fight when the Dwarf activates.  Besides, I was hoping to bring up some help.  I had contacted the Orc Slayer, which is lethal vs Orcs (not Goblins!).  This means as long as he wins combat, he will kill any Orc.  So this guy was a priority target!
But the dice gods were against me.  I had plenty of models to come up to help, but I blew two activations and sent the turn back to the Dwarfs.  Mike decides he can't go wrong with his Quality 2+ leader and rolls three dice.  But he gets snake eyes and one success!  The turn comes back to me after the leader makes move to a better position.  So even a "sure thing" Q2 model has its risks.  Feeling lucky, I activate the Orc in combat and the Orc Slayer takes his head.  First blood and it's greenskins!  Due to poor rolling and getting out of leadership range, my Orcs start to string out.  Here's what it looked like for me at this point.
That Shaman and the night goblin archer were trying to "one-two punch" a kill on the crossbows.  This is done by first transfixing the model with magic and then shooting it with archer (or vice versa... they both had the same stats so it didn't matter).  A transfixed model is treated like a knocked down model.  So any combat defeat or successful ranged attack would kill it.  But I wasn't getting too far with that.

Now it comes down to the big scrum in the middle where the game will be decided.  Mike had been holding back his Dwarfs, but was now bringing them up.  The warriors become Q2 when in range of their leader.  So they could do some serious damage.  I form up a line and the dwarfs engage.  Rather than write up the outcome, here's a before and after set of pictures.

The Orcs were demolished!  My Orc leader managed to kill the Orc slayer dwarf.  But otherwise Orcs got wiped out after a few rounds.  Thankfully the Goblins were all far back.  So the slow moving Dwarfs would have to walk up to them while I took arrow shots.  The Orc leader in the middle took a serious beating.  He has the "tough" special rule.  This basically trades his quality for wounds, so every time he is "killed" he actually lowers his quality.  Once he hits quality 7 he dies.  It took some fighting but he died!

The leader special rule is essential for low quality troops like Orcs and Goblins.  But part of the special rule is that when the leader dies, all remaining models take morale checks.  This was a doubly bad thing for me, as the Leader's death was also the 50% break point for my force as well.  So models would take two tests.  I didn't have to do that, as most models ran off the board when they saw their mighty war boss finally stagger and fall under the angry dwarven axes.  Only a goblin and the shaman remained, and they probably wouldn't last another test.  We called it at that point with a major victory for the Dwarfs.  They protected the village from the Orc invaders!

This was just such a fun and quick game.  It took us about an hour to play, even with all the casual talking that fills up most of that time.  If we'd been playing a campaign or linked series, I could've checked to see which of my models lived, were wounded, or taken captive.  But it was our first "real game" and just wanted to see how it played.

So it held up as I expected.  The rules play well, the two stats augmented with special rules make for well rounded troops.  One thing we noticed is that the points system is a little bit "fudged."  By that I mean my Orcs cost nearly as much as the Dwarfs.  However, Dwarf quality and combat were better.  This is significant because it makes it harder for me to double their combat rolls for a kill.  I should've had more models or better stats to make up for the similar point costs.  I guess if you are playing with friends, just don't be a douche bag and select a power army.  You could easily do that and get something way over powered for the points.  But this is not a tournament game, and so should not be a problem with friends.

I can't say enough good things about this rules set.  I was really able to get involved from the start and play out a skirmish encounter with hardly any referral back to rules.  Not that it's perfectly clear rules.  In fact, the book organization needs a lot of work.  But for most of what you want to do, the basic rules and quick reference guide has all of it handy.  I will definitely be playing more of this game.  I'm planning some lists specifically for it.  So watch for more on that front in the future.

Wednesday, June 15, 2011

Battle Chronicler Review

I like battle reports.  I enjoy reading them and writing them.  I enjoy writing battle reports about my winning the game.  But that doesn't happen all that often.  So I was thrilled to learn about Battle Chronicler, which is free software that creates some really sharp looking battle reports.  I downloaded it right away and decided to try it out on a game of Lord of the Rings.  I had played a game recently with Rob as part of the Tale of Four Gamers challenge.  It was a downright disaster for the Elves and I didn't feel like writing it up.  But when I found this software, I thought I'd give it a try.

The game was straightforward.  I think I remembered the gist of it.  Besides, I wanted to try the software.  So what follows is my attempt to use the software to report the battle I played two weeks ago.  I found the software semi-intuitive.  I was able to import Army Builder lists with ease.  But I've no idea how to use the freakin' software to make my report.  It's not as easy as advertised.  Also, LotR is different than the "infantry block" style of games this software wants you to talk about.  Since each model is it's own unit, I'm thinking to truly represent a game I'd have to enter each model as a separate entity.  Yikes.

So read on.  It's only semi-pretty because it's all screwed up.  For one, the Elves show up as individual models but can only be moved like an infantry block in the software.  Weird.  All in all, I think it would be worthwhile to learn how to use this.  But no manual exists and the forum sucks.  So you're almost on your own with it. Well, it's free!

Scenario: The High Ground
Date played: Friday, June 03, 2011

Elf Warband 175pts

General: Jerry

  • H Arwen Evenstar, Hero
    Expert Rider; Woodland Creature; Nature's Wrath; Elven Blade
    60 points
  • EB 3 Elf Warrior, Warrior
    Woodland Creature; Hand Weapon; Elf Bow; Heavy Armour
    33 points
  • EW 8 Warrior, Elf Warriors
    Woodland Creature; Hand Weapon; Heavy Armour
    80 points
  • Total: 173 points
Wargear
Elf Bow: Range: 24"/56cm; Strength: 3; Move Penalty: Half
Elven Blade: May be used single handed or double handed (if not mounted) -1 Fight, +1 to roll on Wound chart.
Heavy Armour: +2 Defence.

Durin's Folk

General: Rob

  • MH Dwarf Captain, Minor Hero
    Hand Weapon; Armour; Shield
    65 points
  • DB 4 Dwarf Warrior, Warrior
    Hand Weapon; Dwarf Bow; Armour
    36 points
  • W 8 Dwarf Warrior, Warrior
    Hand Weapon; Armour; Shield
    72 points
  • Total: 173 points
Wargear
Armour: +1 Defence.
Dwarf Bow: Range: 18"/42cm; Strength: 3; Move Penalty: Half
Shield: +1 Defence

Turn One: Elves and Dwarfs line up on different sides and run to conquer the hill.
Turn Two: Not much happening yet.
 Turn Three: The Elf bows come up and shoot at the Dwarfs, killing one! The Elves hide behind the hill, not daring to pop up in front of the dwarf bows. Dwarfs return fire and kill one archer.
 Turn Four: Elves engage the Dwarfs on the high ground but lose their fights. Two are killed. The archers move up senselessly into Dwarf bow range and exchange shots. One of the Elf archers dies. Arwen tries to cast a spell but it is resisted.
 Turn Five: The Elves are pushed back and the Dwarfs gain the hill. They have a bad time of it and two more are killed. The lone archer runs for the hill. Arwen moves out of the fight and tries her last attempt at the use of a spell. The Dwarf Captain resists it. The last Elf archer gets on the hill. Arwen engages in combat. The Elf Warriors lose more fights, but manage to take out a Dwarf at last!
 Turn Six to End of Game: The Dwarf bowmen gain the hill and complete the surrounding of the Elves. After this, it is a slaughterfest and all the Elves are killed to the last one. Major victory for the Dwarfs.
So there it is.  Sort of mumble-jumbled as I learned the software.  It's really interesting but not as easy as it is made out to be.  I suppose if you were reporting on the infantry block style games or even 40K, it would be easier.  Also the actual battle had more stuff happening in it, like the special rule for wind knocking everyone down.  The kill counts aren't accurate either.  But you get the idea of the software by now.

Sunday, May 29, 2011

The Foul Taste of Victory

So I got my first game in for the Tale of Four LotR Gamers challenge.  I took 175 points of High Elves against 175 points of Tim's Goblins.  You saw how pretty they looked in an earlier post.  Now see how well they played.

We played on a smaller board with lots of terrain.  For once I welcomed the forests.  I didn't use the forests to my advantage.  But I welcomed them, which is more than I usually do.  The scenario was rolled up, "Seize the Prize."  I had Arwen leading 8 swordsmen and three archers.  Let's do this!

So a blow by blow will probably bore you.  I just moved up to the prize and took some shots along the way.  Shooting was OK; I had three bows and killed about one goblin per turn.  As Tim later illustrated for me, I was picking the wrong targets.  I was knocking out normal goblins and not the Prowlers.  That would hurt later on.
Since Elves move faster, I got to the artifact first.  I thought I should probably screen the swordsman who was digging for it.  So I moved all my guys up into a line that ran between the ruins and the woods.  This meant I put all my guys in open ground, not in the forest, and obliged the goblins by moving into a convenient spot for them to overwhelm me.  I kept archers back to deal with the pesky harassment team coming around the far side of the ruins.  I continued to shoot at all the wrong things.  So many mistakes were made.  But, the Elves looked damn pretty throughout the whole fiasco.

The artifact was buried deep, and didn't come up on the first try.  What also didn't come up was a good round of combat for the Elves.  They won a lot of fights and killed nothing.  I mean nothing.  Zero.  This repeated a few more times, until the Elves started to become trapped and that Prowler backstabber rule started killing off the Elves.  (Who were beautiful even in death.)  Luckily, I got the artifact unearthed before the goblins could catch me.  Unfortunately Durburz broke my line in two and goblins were everywhere!  Elves continued to be ineffectual.  I wasn't using Elven blades, being too chickenshit to lose a fight.  I should have used them, since winning the fight and not hurting anything was driving me nuts.

So the artifact carrier was running away at a good clip.  All his buddies were surrounded and dying.  But Arwen finally got to cast Nature's Wrath without it being countered.  So at a very opportune moment, all the goblins were knocked down!  A lot just got up again, but they were slowed down and those I engaged remained down.  I even killed a few this way.  Here's a shot of them all on their backs.
But after this point, all the Elves died.  They all died.  All of them.  Dead. Except for the Elf with the artifact; he lived. My artifact carrier managed to keep up his courage and continue to run.  A goblin was trailing him, and thanks to winning priority a number of times, was able to catch up to the artifact carrier.  They fought for a couple of turns and the Elf won each time.  I got priority, passed my courage check, and exited the board.

Minor Victory for the Elves.

I call this battle report "the foul taste of victory" because I really disliked the game.  (Nothing on Tim, as he was a great player and host; in fact he had to put up with me pitching a fit. Sorry Tim!)  I wonder if Elves are really my thing.  They were even more frustrating than my "defense three" Corsairs were to play.  This is probably just me reacting to a total change in play style.  I'm not used to being outnumbered and having no margin for error.  Well, I've put time and money into these posers.  So I'm going to learn to like them!

Since the games go fast at this points level.  We played another 175 pt scenario, "To Kill a King".  But this time Tim took a Spider Queen and three giant spiders.  Spooky!
I'll make this short.  We ran at each other and a few Elves died before they killed all the spiders, including the Spider Queen.  Arwen stayed away and lived.  So major victory for the Elves.  I still played the scenario like a dufus.  For one, I refused to use Elven blades where they would've been useful.  Maybe I'll learn to play these Elves, but apparently that won't be any time soon!

Saturday, May 21, 2011

Nuts! Don't Miss This Review!

I really enjoy WWII games.  Back in High School a friend of mine introduced me to Advanced Squad Leader.  Despite a learning curve that rivaled a post graduate degree in supply chain management, I got hooked.  In the early 90s, Steel Panthers and other games by SSI continued to excite me.  So it is strange that when I started looking to table top war games I didn't hone in on WWII.  I only recently picked up FoW.  But I've been wanting to do something in 28mm.  I have it on good authority that there aren't many satisfying 28mm WWII rules.

Enter Nuts! by Two Hour Wargames.  Doing WWII at a skirmish level is what I wanted, just taking a platoon or so.  (Flames of War is my game for company level action.)  I read the website, liked what was described, thought that this rules set might be the thing for me.  Interestingly enough, the game can be played traditionally in a head-to-head game, or as co-op or solo play.  In fact, the rules are geared toward co-op/solo.  So that sold me the rules.  I got the PDF file as soon as I sent payment, and the printed rule book arrived in a few days.  Here are my impressions and a short battle report.  Don't miss the report!

The rules are unlike anything I've seen before.  The core difference in Nuts! is in the use of the Reaction System.  I was not ready for that when I opened the rulebook.  Turns out, you can get a couple of free rules sets that will give you a working game that is focused on this Reaction System.  Basically it works like this:

  • I activate and move into your LoS
  • You see me and react
  • I will react, and we could end up shooting at each other, running away, freezing in place, etc.
  • Our reactions will cause further reactions, sometimes from figures nearby.
  • Things continue until something happens to end the chain reactions (death, duck into cover, etc)
At first this is really hard to understand.  The list I gave above is an example of what it looks like.  I've played through a few times and found that reactions go in lots of directions, dragging in nearby models and creating a very fluid "turn."  In fact, I'm really hard pressed to find where turns begin and end.

Overall it's a very cinematic feel.  You have a leader who is your "star".  The star can have attributes that help or hinder him in some way.  He's your Hollywood warrior, able to shrug off wounds that hurt lesser men.  But he's not a hackneyed Sgt Rock.  Despite being immune to death from lowly grunts, he still hunkers behind a wall in fear of getting his head blown off.  He is still a real man, worried about his life.  In fact, the high point of this game is that all your modes are real guys, so to speak.

Each model has a reputation rating (Rep), that drive just about everything from how he reacts to how he shoots.  At first, I was confused but after a couple of run-throughs of the game it's a lot clearer.  In fact, the rep is a very realistic portrayal of how a raw recruit might react under fire versus the battle hardened vet on his third campaign.

A battle report of the introductory scenario will help show things a little better.  After that, I'll sum up what I like and dislike about the game so far.

First thing, I don't own any WWII figures.  But have no fear!  Thanks to Hing Fat Toy Company I now have full squads of Americans, Germans, British, and Japanese, all ready for the gaming table!  Too bad they're 54mm figures.  I'll keep using these until I can buy suitable replacements.

JUNE 1944  You're in command of a small group of paratroopers in France.  Your unit has been dispersed all over the drop zone and is currently reforming.  Right now it's just you and three others.  Your major concern is to make it to the rally point.  You are now coming up onto a ruined house.  The squad crosses a road, filtering into the trees beyond.  The ruined house is partially surrounded by a low stone wall.  Woods are beside it.  Two Germans are spotted standing outside, one sitting on the wall and the other leaning in the doorway of the ruins.  Your men fan out, drop into a crouch as they take up positions at the edge of the treeline.  Time to give Gerry hell!

So that's some writing from the book with my own additions.  Enough with the Stephen Ambrose imitations!  Here's turn one:
My turn has activation (like priority in LotR).  This has an added twist in that you can only activate models whose rep equals or exceeds what you rolled for activation.  So rolling low is best, as it allows you to move all models. This reflects hesitancy that a recruit would feel moving into fire.  But since you can group up with a hi rep leader, it's not a problem.
Yes, that's paper cut out terrain.  Don't laugh!  I have no reason to own terrain (other than that niffty GW battle mat) and this actually looked pretty good in person.  So as I was saying, both Dorfman on the wall and Engles in the door see me.  They react by taking quick shots, which elicits return fire from the men being shot at and those within 4" of them.  These shots fly back and forth with little effect due to cover and snap shooting.  But the US Sgt (my star) puts his SMG to good use and kills Dorfman and forces Engles to retire, meaning he runs for safer cover.  The shooting now reveals the location of other German troops.  I roll on the chart provided with the mission and find that the German leader, Arnold, and machine gunner Beck and his loader Conrad are holed up in the ruins.  So this won't be an easy fight to dislodge them!

It's turn two.  Germans win the activation roll, but scored a five. The highest Rep is a 4, so they do nothing.  They are surprised to suddenly come under withering fire and can't react!  Engles is running and Dorfman is screaming for his mother.  (Dorfman was not killed, but taken out of the fight.  That means if a medic can reach him, he might be saved.  It also has implications for campaign play.  If the US catches him, they can kill him or take him prisoner. They'll have to guard him, if the want to do that.  I digress!)
Notice Engles behind that piece of card (which represents trees).  He's hunkered down, meaning I don't see him.  I could remove him and put a marker in his place.  But I face him away to show that status.  Now the US activates, and they had a roll of 2 which is way under the Sgt's rep of 5.  So they start shooting like nuts.  The LMG gunner is actually killed.  Anyone around him of equal or lower rep takes a "man down test" to see if they'll move to safer cover.  Arnold doesn't need to test, and Conrad merely wipes Beck's brains off his face and pulls out his own rifle.  Too bad for that, because Private Baker kills him as well.  Let me tell you this was fantastic shooting by the US.  In my first games, I literally rolled reaction tests for 20 minutes with nothing happening.  (That's something I'm going to fix with a house rule for sure!)  Since no one can see Engles peeing himself in the woods, the turn ends.


Turn three and the German position is crumbling.  The US paratroopers are sensibly remaining in cover, making them hard to hit with the unsteady and panicked return fire from the Germans.  The Germans activate first.  Since these are NPCs, I roll a focus test to see what they will pick for targets.  Arnold may not be the bravest Nazi, but he knows what has to be done.  He has an SMG and good chances to force back some of the US trooper facing him.  He sprays three shots into the trees, forcing Private Able to retire.  But return fire from the US Sgt takes Arnold out of the fight, toppling back into the ruins with a gurgled scream.  The next German group to activate is poor Engles.  He becomes more frightened, decides the trees are not enough protection and makes for the ruins.  Since he is still considered "hunkered down" the US doesn't see him thread his way back to the ruins.

It's now time for the US to activate.  Private Able rallys and the Sgt gives the order to run for the wall.  They're going to storm the ruins and clear it out for sure.  Private Baker readies a grenade (by passing a test) and can throw it when in range.  The US paratroopers line up on the wall, Private Baker hauls back and throws it perfectly.  They now see Engles whimpering inside, balled up like a kid who lost his security blanket.
The ruins aren't enough to ward off a grenade.  A cloud of dust and debris belches from the small house and then all is silent.  Engles is taken out of the fight (maybe he's barely alive, deaf and dazed under the rubble), and so the area is cleared.  Victory for the US!  Now to get to that rally point!

So, Nuts! is a fun game.  What I like is the cinematic feel, the individuality of the models, and the fluidity of the fights.  What I don't like is throwing dice for every damn thing all the damn time.  Maybe it's because I'm playing solo, but there are so many tests to take, I'm always rolling dice.

There's also vehicle rules and rules for artillery guns. On the THW Yahoo group you can download rules for mortar fire (which seems a glaring omission from these rules) and for artillery barrages.  The game is definitely meant to be played with a platoon at most.  If I played this at the platoon level solo, there's no way I could do it in two hours!  All those reaction tests followed by reaction tests!  But for a few squads this is really a great game.  It takes some getting used to the reaction system.  But it's starting to clear up for me.  I'll test out the vehicle rules next, using some of my 15mm FoW stuff for that.

Overall, I think Nuts! is a great game with a lot of potential for story and campaign based gaming.  I'll keep you posted on where I go with it next.